Quality criteria for video
Introduction
 Creating a good strobe image is as much an art as a science. All important
guidelines of photography and videography apply when creating strobe images.
Creating a good strobe image is as much an art as a science. All important
guidelines of photography and videography apply when creating strobe images.
High-quality strobe image
Tripod
Spatio-temporal separation
Subject and background
Background movementHigh-quality photography
Foreground
Background
Contrast and tone
Shutter speed
Depth of field
High-quality strobe image
APAS/Wizard Strobe � requires the camera to be static. The use of a tripod is
highly recommended.
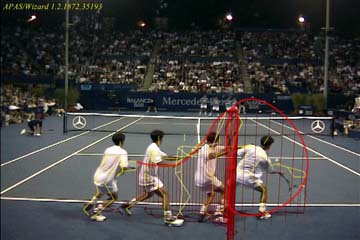
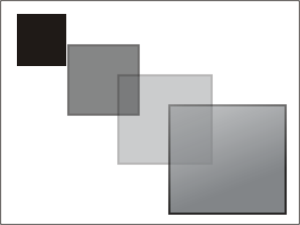
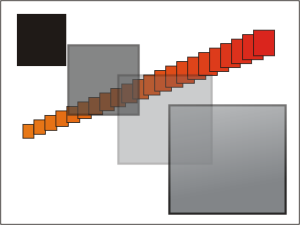
The most important goal when creating a strobe image is to maximize spatio-temporal separation.
Spatio-temporal separation means separating both space and time
at the same time.
| Concept |
Description |
| Space |
The area occupied by the image plane (the plane surface of
the imaging sensor, perpendicular to the viewing direction, at
which the optics are focused). |
| Time |
Time is identified by events. The closes events are
together, the less the subject will have moved. |
This is best illustrated by some examples:
 |
 |
| Example: good
spatio-temporal separation. |
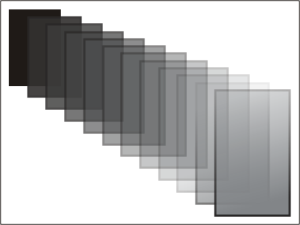
Too many events: probably not enough
temporal separation. There is more overlap than
in the previous example. Note that this may still produce a good
strobe image. This issue can be addressed by selecting less
events. |
 |
 |
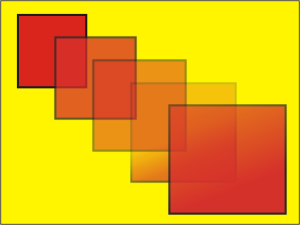
| Too far: there is not enough
spatial separation. This is caused by the subject being too far
away from the camera (or angle of view is too wide). Zoom in or
move closer to the subject. |
Overlap: there is not enough
spatial separation, subject is
moving towards the camera, therefore overlapping previous frames.
This can be addressed by moving the camera to a different
location. |
It is important that the subject stands out from the background. If the
subject is wearing black clothes and the background is very dark, it will be
difficult to tell the subject apart from the background.
This issue is usually addressed by learning how to control lighting of your
scene.
 |
 |
|
Low contrast: it
will be difficult to tell the subject apart from the
background |
Good contrast: it will be easy to separate the
subject from the background |
The APAS/Wizard Strobe � algorithms are based on detecting motion. When
other elements than the main subject are moving in the video (such as people walking in the background) the algorithm will assume that they are
part of the strobe image. This issue can be avoided by positioning your
camera so that this does not happen.
 |
| Background movement: the moving element in the
background will become part of the
strobe image |
High-quality photography
A large percentage of otherwise good videos is ruined because they
include unnecessary or distracting foreground. This common fault can
result from the photographer standing too far away from their subject
when they take a video, or the fact that normal focal length or
standard lenses cover a relatively wide angle of view.
Undesirable foreground can be eliminated by moving in closer to the
subject, by making pictures with a longer than standard focal-length
lens, or by changing viewpoint or camera angle. In most cases, the
foreground should be sharply focused and of sufficient depth to furnish
substantial support for the subject. No object in the foreground should
ever be so prominent that it distracts from the subject. You should
clear the foreground of items that have no connection with the picture.
Generally, the foreground contains the leading line that is the line
that leads the eye into the photograph and toward the point of interest.
Whether this line is an object or series of objects or shadows, it
should be sharply focused. A fuzzy, out-of-focus foreground usually
irritates the senses and detracts from emphasis on the subject matter.
The background is almost as important an element in good composition
as the camera angle. Too often it is overlooked when composing a scene
since the photographer normally gives so much attention to the subject.
Be particularly observant of the background to see that it contains
nothing distracting. A tree or pole that was unnoticed in the distance
behind a person when composing the scene may appear in the photograph to
be growing out of his or her collar or supporting his or her head.
The background should be subordinate to the main subject in both tone
and interest. It should also make the subject stand out and present it
to best advantage. Unsharpness and blur are effective ways for
separating the subject from the background. Unsharpness can be
accomplished by using a relatively large f/stop to render the background
out of focus. This is done to create the impression of the subject being
closer to the viewer or to express motion by holding the camera still as
you use a shutter speed that is too slow to "stop" the motion.
|
|
|
Example: low contrast image |
As we look around a scene, the irises within our eyes can adjust to
changing conditions as we focus on regions of varying brightness�both
extending dynamic range where we can discern detail, and improving the
local contrast. This is apparent when we stand near a window in a dark
room on a sunny day and see not only detail which is indoors and around
the window (such as the frame or the pattern on the curtains), but also
that which is outside and under the intense lighting (such as the blades
in the grass in the yard or the clouds in the sky).
Cameras, on the other hand, cannot always capture such scenes where the
brightness varies drastically�at least not with the same contrast as we
see it. Traditional landscape photography has practiced a technique to
overcome this limitation by using a filter which lets in more light in
the darker regions, and less light in the brighter regions, resulting in
an evenly exposed image throughout.
A histogram can also describe the amount of contrast. Contrast is a
measure of the difference in brightness between light and dark areas in
a scene. Broad histograms reflect a scene with significant contrast,
whereas narrow histograms reflect less contrast and may appear flat or
dull. This can be caused by any combination of subject matter and
lighting conditions. Images taken in the fog will have low contrast,
while those taken under strong daylight will have higher contrast.
Contrast can have a significant visual impact on an image by
emphasizing texture. High contrast subjects have deeper shadows and more
pronounced highlights, making them appear to "pop" out at the viewer.
 If you are photographing fast moving objects you need to select fast
shutter speeds to capture the sharpest picture you can. One exception to
this is when you are panning the camera with the subject, the object of
the exercise here is to render the subject sharply and blur the
background, so a careful selection of the right shutter speed to do both
is neccessary. A little blur in the right places on a picture gives a
greater sense of movement than if everything is pin sharp. This blur,
however, must be in the right places, normally we want to see the head
and torso rendered sharply but, if the feet and hands are blurred, it
can often be a good thing. Blurring the background can also get you out
of trouble when there is a lot of clutter that will detract from the
main subject. Getting the shutter speed right to render the correct
balance of sharpness and blur on any given subject can really only be
determined through trial and error. One of the great advantages of
digital cameras is that this learning process can be a lot shorter than
it was before.
If you are photographing fast moving objects you need to select fast
shutter speeds to capture the sharpest picture you can. One exception to
this is when you are panning the camera with the subject, the object of
the exercise here is to render the subject sharply and blur the
background, so a careful selection of the right shutter speed to do both
is neccessary. A little blur in the right places on a picture gives a
greater sense of movement than if everything is pin sharp. This blur,
however, must be in the right places, normally we want to see the head
and torso rendered sharply but, if the feet and hands are blurred, it
can often be a good thing. Blurring the background can also get you out
of trouble when there is a lot of clutter that will detract from the
main subject. Getting the shutter speed right to render the correct
balance of sharpness and blur on any given subject can really only be
determined through trial and error. One of the great advantages of
digital cameras is that this learning process can be a lot shorter than
it was before.
Not only moving objects suffer from too slow a shutter speed. If you
are holding the camera in your hand rather than having it mounted on a
tripod, you will see the telltale signs of 'camera shake' (i.e. the
movement of the camera) at shutter speeds longer than 1/125th of a
second. A secure pair of hands will be able to get away with 1/60th or
even 1/30th of a second but the camera would be better mounted on a
tripod. Once again I will say at this point that the difference between
a mistake and an effect is usually the degree. A small amount of blur
would be considered a mistake, whereas really blurred streaks of light
can be an interesting effect. It's all a question of convincing the
viewer that you intended to do it.
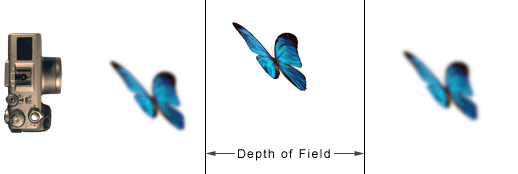
In film and photography, the depth of field is the distance in front of and
behind the subject which appears to be in focus. For any given lens setting,
there is only one distance at which a subject is in focus, but focus falls off
gradually on either side of that distance, so there is a region in which the
blurring is tolerable. This region is greater behind the point of focus than it
is in front, as the angle of the light rays change more rapidly; they approach
being parallel with increasing distance.
Our eyes can choose to have any particular object in perfect focus,
whereas a lens has to choose a specific focal point, and what
photographers call a �depth of field,� or the range of distance to each
side of the focusing plane which still appears to be in sharp focus.
This difference presents the photographer with an important interpretive
choice: does one wish to portray the scene in a way that draws attention
to one aspect by making only the aspect in focus (such as would occur
during a fleeting glance), or does one instead wish to portray all
elements in the scene as in focus (such as would occur by taking a
sweeping look throughout). Until recently, traditional night photography
was especially restricted with this choice, because there is always a
trade-off between the length of the exposure, the depth of field, and
the noise levels (or film grain) for a given photo. Where artistic
flexibility is required, I often use a technique which utilises multiple
exposures to create a single photo that is composed of several focal
points; similar to how our eyes may glance both near and distant in a
far-reaching scene.